
Reposted from my old blog The Sweet Shop:
DIY Vintage Knob Jewelry & Accessories Display Board
I found an amazing DIY hanging jewelry & accessories display online one day (Pinterest? Etsy? Can't quite remember where I saw it)...it's the perfect piece to organize and display your favorite necklaces, bracelets, scarves, you name it. The ones below are made up of wooden molding boards, glass/ceramic/metal knobs in various shapes and sizes, two screws and some bolts and washers. A short list of materials..but it requires a wide array of tools, which is why I enlisted my Dad who i'm pretty sure owns every tool ever made!

We created a few different pieces: two long boards - one with small mismatched knobs and one with slightly larger mismatched knobs. a short board with extended knobs to hang towels in the kitchen. two blocks used to string up sunglasses.
My Mom ordered a ton of drawer knobs off Ebay, she found some great groups of 2-4 knobs in multiple colors. The knobs she found were amazing! I loved that we had so many to choose from.
The molding boards were purchased from Lowes, where they were willing to cut them into the sizes we needed. We had one more cut to make at home so we used a Mitre box with a saw to cut the molding.

The prep work involved deciding the array of knobs for each board as well as the spacing between them. I spaced the knobs about 2" apart to allow space for fluffy scarves.


After deciding on placement & spacing I punched a guiding hole where the knobs would eventually be placed. We then used a drill to create holes all the way through the board so that the screws on the knobs could pass freely through the opening. Don't forget to drills a hole on the end of each side of the board, this hole will be for the screw to mount the board on the wall.
We then had to countersink the back of the board so that the washer and bolt would lay flat against the back of the board. This is needed so that the board lays flat on the wall.
There was a lot of trial and error during this part of the project. Since the knobs are all mismatched sometimes the countersink needed to be adjusted, sometime the size of the knob screwed were inconsistent and the drilled holes needed to be adjusted.


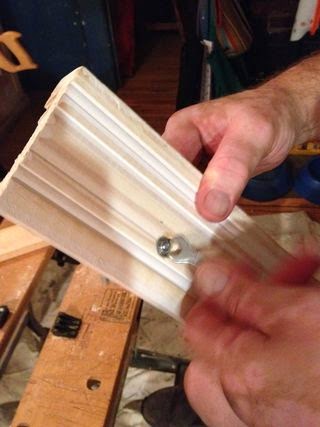
We inserted the knob screws through the board while placing a washer and bolt on each side of the board to keep it in place.
Note: if you want to hang larger items on your board you can use the washer & bolt to create the length of the screw on the front side of the board. I kept my knobs flush on the jewelry & accessories display board but for the kitchen board, on which I wanted to hang towels, I kept the knob about 1 1/2" from the front side of the board.
I was able to use square wooden rossettes (that I painted white) to create my make-shift sunglasses/eyewear display. Any type of thread/yarn/rope can be used to create the strand that the sunglasses will hang on. Just mount the two rosettes level with each other about a foot apart then tie the string the thread/yarn/rope to hang from each knob.


We created a few different pieces: two long boards - one with small mismatched knobs and one with slightly larger mismatched knobs. a short board with extended knobs to hang towels in the kitchen. two blocks used to string up sunglasses.
My Mom ordered a ton of drawer knobs off Ebay, she found some great groups of 2-4 knobs in multiple colors. The knobs she found were amazing! I loved that we had so many to choose from.
The molding boards were purchased from Lowes, where they were willing to cut them into the sizes we needed. We had one more cut to make at home so we used a Mitre box with a saw to cut the molding.
The prep work involved deciding the array of knobs for each board as well as the spacing between them. I spaced the knobs about 2" apart to allow space for fluffy scarves.
After deciding on placement & spacing I punched a guiding hole where the knobs would eventually be placed. We then used a drill to create holes all the way through the board so that the screws on the knobs could pass freely through the opening. Don't forget to drills a hole on the end of each side of the board, this hole will be for the screw to mount the board on the wall.
We then had to countersink the back of the board so that the washer and bolt would lay flat against the back of the board. This is needed so that the board lays flat on the wall.
There was a lot of trial and error during this part of the project. Since the knobs are all mismatched sometimes the countersink needed to be adjusted, sometime the size of the knob screwed were inconsistent and the drilled holes needed to be adjusted.
We inserted the knob screws through the board while placing a washer and bolt on each side of the board to keep it in place.
Note: if you want to hang larger items on your board you can use the washer & bolt to create the length of the screw on the front side of the board. I kept my knobs flush on the jewelry & accessories display board but for the kitchen board, on which I wanted to hang towels, I kept the knob about 1 1/2" from the front side of the board.
The next step is to tighten the bolt, make sure it's flush with the back, in most cases the screw will need to cut down. My Dad used a saw to cut it down then sanded down the metal until it was smooth. You don't need an electric sander for this, but it sure does help.


Ta Da!

I was able to use square wooden rossettes (that I painted white) to create my make-shift sunglasses/eyewear display. Any type of thread/yarn/rope can be used to create the strand that the sunglasses will hang on. Just mount the two rosettes level with each other about a foot apart then tie the string the thread/yarn/rope to hang from each knob.
To mount the boards onto the wall we used two long screwed that were painted white to match the molding board. The real trick while mounting is to use a level so that board isn't crooked on the wall, I know that would drive me crazzzy everytime I looked at it.

And voila, here you have an entire accessories display area. I added in my jewelry bulletin board (see my past post) and an IKEA mirror & cubical storage shelf and the area was able to hold most of my accessories.

Thanks to my Dad for my help with this. Shortly after we made this project (yes, it took me months to post this) he had his surgery. I can't wait for him to be fully recovered so we can get back to making more projects together. <3

And voila, here you have an entire accessories display area. I added in my jewelry bulletin board (see my past post) and an IKEA mirror & cubical storage shelf and the area was able to hold most of my accessories.
Thanks to my Dad for my help with this. Shortly after we made this project (yes, it took me months to post this) he had his surgery. I can't wait for him to be fully recovered so we can get back to making more projects together. <3

No comments:
Post a Comment